Mastering Pen-and-Ink Tree Illustration: A Step-by-Step Guide to Capturing Organic Beauty
The Timeless Appeal of Pen-and-Ink Tree Drawings
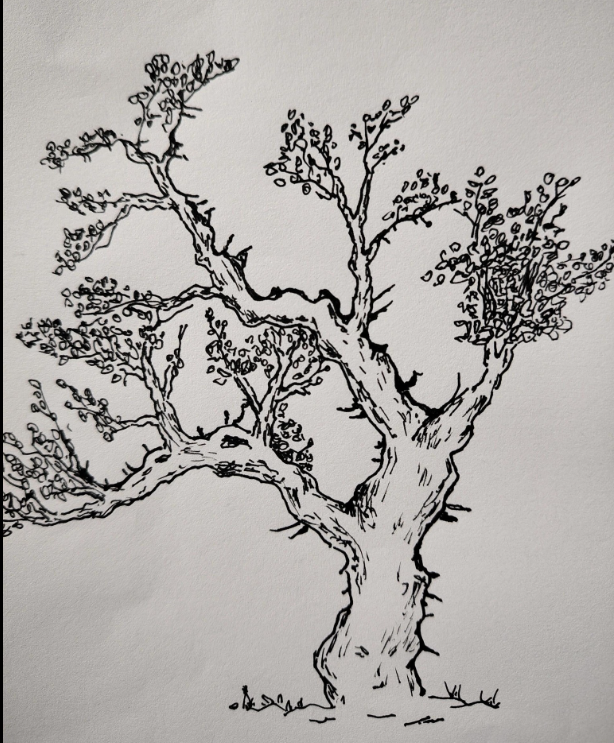
Pen-and-ink botanical illustrations have enchanted artists and nature lovers for centuries. There’s something undeniably captivating about the crisp contrast of black ink on white paper, especially when it brings a tree’s gnarled trunk and delicate leaves to life. In our featured sketch, twisted branches arch gracefully, each knotted limb and tiny leaf rendered with meticulous linework. Whether you’re an aspiring illustrator or a seasoned artist seeking fresh techniques, exploring the art of drawing trees in pen and ink connects you to a rich tradition of natural observation and creative expression.
Why Trees Are Perfect Subjects for Ink Work
Trees offer a wealth of visual interest that plays beautifully to the strengths of pen-and-ink media:
- Textural Contrast: The rough, fissured bark versus the feathery clusters of leaves creates opportunities for varied line techniques—hatching, stippling, and crosshatching.
- Structural Complexity: Branch intersections and root forms challenge you to capture three-dimensional depth and organic flow.
- Seasonal Variations: From bare winter skeletons to lush summer canopies, trees transform, giving your portfolio dynamic variety.
By focusing on these elements, your pen-and-ink tree drawings can showcase both technical skill and emotional resonance.
Building Your Toolkit: Essential Materials for Ink Illustration
Before diving into branches and foliage, assemble the right supplies:
- Nib Pens & Technical Pens: A fine nib (e.g., size 0.3–0.5 mm) or a set of technical pens provides consistent line widths, ideal for detailed bark textures and leaf outlines.
- India Ink & Brush Pens: For bolder strokes and rich blacks, brush pens or a dip pen with India ink let you vary line weight fluidly.
- Quality Paper: Choose smooth, heavyweight Bristol or hot-pressed watercolor paper to prevent bleed-through and allow clean, sharp lines.
- Pencils & Erasers: Lightly sketch your composition with an H–HB pencil; use a kneaded eraser to lift stray marks after inking.
With these basics on your drawing table, you’re ready to tackle every knothole and leaf cluster.
Step 1: Observational Sketching
Start by really seeing your tree:
- Study the Form: Notice the main trunk’s flow, major branch forks, and overall silhouette.
- Thumbnail Compositions: Create small, quick sketches (thumbnails) to explore different placements and cropping.
- Light Pencil Layout: On your final sheet, lightly map the trunk’s central line, major branches, and canopy shape.
This preliminary phase sharpens your focus so that the ink lines you lay down later are both deliberate and dynamic.
Step 2: Inking the Trunk and Branches
Bring structure and weight into the tree’s body:
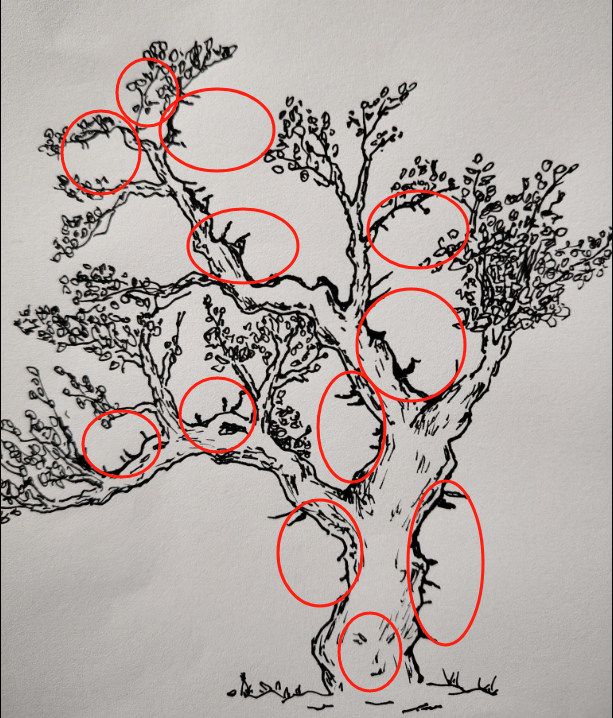
- Vary Line Weight: Press harder or switch to a broader pen for the trunk’s outer contour; use a finer nib for inner cracks and smaller twigs.
- Bark Texture with Hatching: Emulate wood grain by drawing parallel lines that follow the trunk’s curve. Add crosshatching in deeper crevices for shadow.
- Branch Joints: Emphasize where branches meet the trunk by darkening those junctions and letting lines taper away, suggesting thickness fading into slender limbs.
Think of the trunk as the skeleton—you’re mapping its strength before adorning it with foliage.
Step 3: Rendering Leaves and Foliage
Leaves can feel overwhelming, but a few smart choices make them manageable:
- Cluster Suggestion: Rather than drawing each leaf, group them into clusters—outline the canopy’s edge with curving lines, then dot in leaf shapes inside.
- Stippling for Depth: Use tiny dots to fill shadowed clusters, reserving white space for highlighted areas. This technique adds volume without clutter.
- Directional Marks: Let the leaf shapes and stipples follow branch directions, reinforcing the form and flow of each limb.
By balancing defined edges with loose internal textures, you capture the dance of light filtering through leaves.
Step 4: Grounding with Roots and Surroundings
No tree floats in a void—it lives in a landscape context:
- Root Hints: Sketch exposed root flares at the base, using contoured lines to suggest bulges and dips.
- Understory Details: Add tufts of grass, fallen leaves, or rocks with minimal linework to anchor the composition.
- Atmospheric Sense: Lightly hatch the background behind the canopy to help the tree pop off the page, offering subtle contrast.
These environment touches create a sense of place, inviting viewers into your microcosm of nature.
Common Pitfalls and How to Avoid Them
Even experienced artists slip up. Watch out for these mistakes:
- Overworking Details: Too many lines can muddy the drawing. Aim for clarity—sometimes less is more.
- Ignoring Light Source: Decide where light falls (left, right, top) and keep your hatching consistent, or shadows will feel chaotic.
- Flat Lineweight: Uniform lines make a scene static. Vary thickness to emphasize structure and hierarchy.
- Uneven Composition: A heavy canopy with no counterbalance feels top-heavy. Use ground elements or negative space on one side for equilibrium.
By staying mindful of these traps, you maintain the vitality and readability of your pen-and-ink tree.
From Page to Print: Showcasing Your Inked Trees
Once your masterpiece is complete, consider these steps to share your work:
- Scanning and Cleaning: Use a high-resolution scanner to capture every fine line. In Photoshop or GIMP, remove smudges and enhance contrast.
- Printing on Fine Art Paper: Giclée prints on textured cotton rag paper preserve ink detail and offer a gallery-quality finish.
- Mat and Frame with Care: Choose neutral mats and simple frames that let the black-and-white artwork take center stage.
- Portfolio and Social Media: Post process photos and time-lapse videos to engage followers—show how your tree comes to life from pencil sketch to final ink.
By presenting your art professionally, you highlight the craftsmanship behind each branch and leaf.
Conclusion: Growing Your Skills, One Branch at a Time
Drawing trees in pen and ink marries careful observation with expressive mark-making. From selecting the right tools and mapping your composition to mastering bark textures and leaf clusters, each step deepens your connection to the natural world. Trees tell stories of resilience, change, and hidden beauty—stories you capture and share through your inked lines. So pick up your pen, step outside to a nearby tree, and let its twisting limbs and whispering leaves guide your hand. With practice and patience, you’ll cultivate a portfolio as rich and varied as the forests themselves.